MultiTech FaxFinder Integration
Date:
March 19, 2008
Subject:
Configuration guide for integrating AltiWare with a MultiTech FaxFinder server
Distribution: All Dealers
Doc Type:
Application note
Release:
5.0A
Scope:
5.0A Update 4 - 5.2
Application: AltiWare
Hardware: MultiTech
FaxFinder Server
Keywords: MultiTech,
Fax, FaxFinder, Fax Server
Obsolete: No
Introduction
Multi-Tech
FaxFinder Fax Server is an economical fax server solution for the SMB market.
This document provides a step-by-step guide to set up AltiServ to work with
FaxFinder Server. The focus of this document is to provide setup and
configuration instructions to support a fax call from AltiServ to FaxFinder and
check if FaxFinder answers and processes fax mail to the user’s mailbox properly.
Please refer to the FaxFinder manual for more details.
Requirements
AltiServ:
Software – OE/ACM 5.0A with Update 4 or above. Update 4 supports “Free Format”
call forwarding which has the capability to transmit additional DTMF tones to
FaxFinder as the fax destination ID.
Hardware – Triton or Quantum analog station
port for Multi-Tech FF100 (one port) and FF200 (two ports)
FaxFinder:
Software – FaxFinder Version 1.03 (tested
version) or above
Hardware – Model
FF100 (tested model) and FF200
Please
follow the steps documented in the Multi-Tech FaxFinder manual to connect the
following:
1.
Power adaptor.
2.
AltiServ station port(s)
to FaxFinder using RJ11 cable.
3.
A cross-over Ethernet
cable from FaxFinder to a PC with IP address 192.168.2.2 for initial setup; or
connect FaxFinder to an Ethernet switch to communicate with a PC with IP
address 192.168.2.2.
4.
Write down the station
port extension number (this document uses 200 as an example).
5.
If using FF200 with two
fax ports, you may need to set up a hunt group so that AltiServ can route a fax
call properly.
Please
follow steps documented in the Multi-Tech FaxFinder manual to configure the
following:
1.
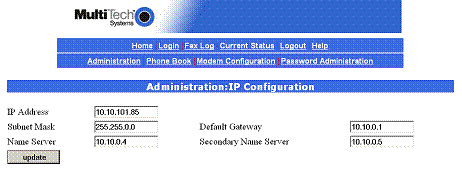
Provide FaxFinder a
dedicated local LAN IP and configure related network addresses. Please follow
steps in the FaxFinder manual to log into the configuration browser. You can
connect FaxFinder, with default IP of 192.168.2.1, to your LAN and use a PC
with IP set to 192.168.2.2 to bring up the configuration web page. The
configuration web page can be opened by typing http://192.168.2.1 in your browser.
2.
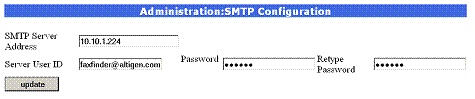
Configure SMTP so that
FaxFinder can send fax mail to mail server:
3.
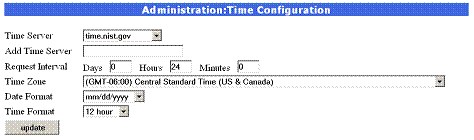
Configure Time Zone and
Date/Time Format:
4.
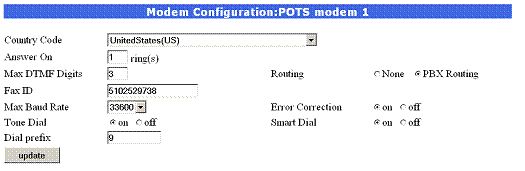
Configure the modem to
receive a fax call
Three important fields need your attention:
Answer On – change to 1 ring to speed up answer time. Default
is 2 rings.
Max DTMF Digits – Depending on your DID/DNIS
number length, you need to set up this field correctly. This test example uses
3 digits. The default is 4 digits.
Dial Prefix – Enter trunk access or route access code here. It
is required for outbound fax dialing.
5.
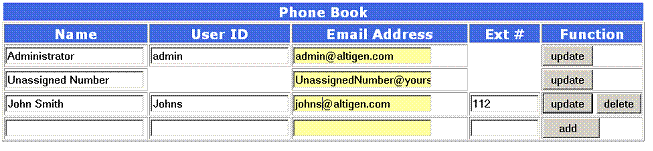
Add users in Phone Book.
FaxFinder will use Ext# to associate with Email
Address for the user. Note that the Ext# is actually a fax DID/DNIS number from
the AltiServ point of view. It is the DTMF stream AltiServ will generate and
transmit to FaxFinder through the station port.
6.
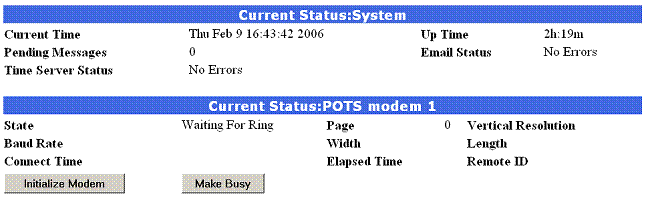
Check the status and make
sure there is no error in system settings and that the POTS modem is in
“waiting for ring” state.
C. Configuring Altiserv
<It helps me understand the scenario better if this AltiServ configuration section goes before the
1.
Configure the extension port to connect
to FaxFinder. In this test case, extension 200 is connected to FF100 unit. The
following configurations are recommended.
-
Disable
Intercom.
-
Disable
Mailbox (This is a very important step. If there is a voice mail in this
extension, the system will play a stutter dial tone. FaxFinder will think there
is no dial tone and the outbound fax call may fail.)
-
Disable
Busy Call Handling so that an incoming fax call will not go to voicemail when
FaxFinder is busy.
- Disable No Answer Call Handling so that an incoming fax call cannot go to voicemail when FaxFinder is not in service. If you would like to have an alert when FF100 is not answering a call, you can configure No Answer Call Handling to forward to the administrator’s extension. Admin will check FF100 status when a fax call is received.
- Set Caller ID Signal Format to NONE (Extension Configuration -> General Tab -> Line Properties).
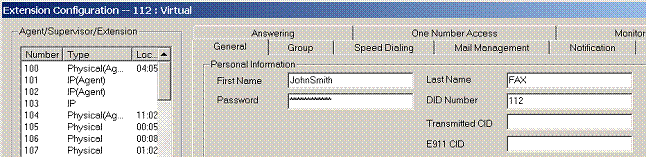
2.
Create a virtual extension for
every FAX number. Enter the proper DID/DNIS number in the DID number field.
3.
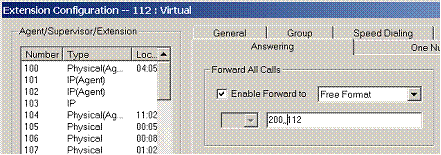
Configure a virtual extension to
forward a fax call to FF100 unit.
-
Enable
Forward All Calls.
-
Select
“Free Format”.
-
Enter
fax port Extension number followed by two commas, then the fax DID/DNIS number
for this user.
-
Each
comma means one second of delay after FF100 “Off-hook”. In lab testing, one
comma works fine. However, two commas are recommended to make sure FF100 will
not get DTMF too quickly.
4.
Repeat step 3 for all virtual
extensions mapped to fax DID/DNIS numbers.
5.
If you are using a two-port FF200
unit, create a hunt group and add both extensions connecting to FF200 fax ports
to the hunt group member list. You need to disable busy call handling, no
answer call handling, as well voicemail box for this hunt group. Also, you need
to replace the fax port extension number in step 3 to the hunt group number in
the Free Format forwarding field.
D. Testing
1.
After completing all configurations, pick up an
AltiServ extension and dial a fax virtual extension number, in this example,
112. You should hear modem tone after call connects.
2.
Fax a test page from fax machine to
a fax DID/DNIS number and check if FaxFinder answers and processes fax mail to the
user’s email box properly.
Tips:
If you
forget the IP address or password of FaxFinder, use an AltiServ extension to
dial the extension port connecting to FaxFinder. After FaxFinder answers, press
the following digits to reset IP or password:
Pressing 1***
resets IP
Pressing 2*** resets password