Multi-Tech ATA for Fax Installation and Configuration Guide
Date:
May 1, 2008
Subject:
FoIP between two AltiGen systems using an MVP130
Distribution: All Dealers
Doc Type:
Application Note
Release:
5.2
Scope:
5.1 - 5.2
Application: AltiWare
Hardware: MVP130
Keywords: FA242,
MVP130, FoIP, Fax, T.38, T38, MultiTech, ATA, Fax Over IP
Obsolete: No
Introduction
For
companies that want to handle fax calls among different AltiWare systems,
AltiGen recommends using the MultiVOIP® Voice/Fax Over IP Gateway, model MVP 130, in conjunction
with AltiServ systems. This application note provides instructions for
integrating the MVP 130 VOIP gateway with AltiServ.
Prerequisites
- MultiVOIP®
Voice/Fax Over IP Gateway, model MVP 130,
with firmware version 1.09.08.
- Both the AltiServ system and
the MultiVoIP gateway need to have the same public IP address or be in the
same private network range.
- In AltiAdministrator, PBX >
Extension Configuration,
Connect Voice Stream to Server should not be checked.
- In the MVP 130, make sure that
the Interface Type under MultiVoIP > Configuration > Interface is FXO.
Configuration Example
In this
example, the two MVP gateway IP addresses are configured as:
- 192.168.1.105 and
- 192.168.1.106
- In the MVP 130, go to MultiVoIP
> Configuration > Ethernet/IP, and assign a Gateway
Name, for example, MultiVoIP2.
- Go to MultiVoIP > Configuration > Interface, and set Interface Type to FXO.
- Go to MultiVoIP > Configuration > Call Signaling > SIP, and set Singaling Port to “5060”.
- Go to MultiVoIP > Configuration > NAT Traversal, and make sure that STUN > Enable is not checked.
- Go to MultiVoIP > Advanced > Packetization Time, and set G.723.1@6.3 Kbps
to 30 (ms).
In MVP gateway 192.168.1.105:
- Go to MultiVoIP > Phone Book > Outbound Phone Book, and add a new entry.
a.
Check Accept Any Number.
b.
Set IP Address to
“192.168.1.106”.
c.
Select Protocol Type as SIP.
d.
Select Transport Protocol as
UDP.
e.
Set SIP Port Number as
“5060”.
- Go to MultiVoIP > Phone Book > Inbound Phone Book, and add a new entry.
a.
Set Remove Prefix to “2007”.
b.
Click OK under Save & Reboot.
In MVP gateway 192.168.1.106:
- Go to MultiVoIP > Phone Book > Outbound Phone Book, and add a new entry.
a.
Check Accept Any Number.
b.
Set IP Address to
“192.168.1.105”.
c.
Select Protocol Type as SIP.
d.
Select Transport Protocol as
UDP.
e.
Set SIP Port Number as
“5060”.
- Go to MultiVoIP > Phone Book > Inbound Phone Book, and add a new entry.
a.
Set Remove Prefix to “2223”.
- Go to MultiVoIP > Phone Book > Inbound Phone Book, and add a new entry.
a.
Set Remove Prefix to “2221”.
b.
Set Add Prefix to “2221”.
4.
Click OK under Save &
Reboot.

Figure 1. FAX integration between
MVP130 and AltiServ
In AltiServ 1, IP
address 192.168.1.100, configure the following:
- Add a virtual extension 2011.
- Go to Extension
Configuration > Answering > Forward All Calls.
- Check
Enable Forward to and choose Free Format.
- In
the text box below that, type in “2007,,,2221”.
- Go to PBX > In Call Routing Configuration > DNIS Routing, and add a new DNIS Routing.
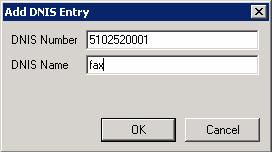
- Choose all the Route
Incoming Calls to Extension
options, and select extension 2011.
Call scenarios
- Fax extension 2000 can make a
fax call by dialing 2011. The call will be sent through MVP 130 to AltiServ
2’s fax extension 2221.
- Fax machine, 4082520001, can
make a fax call by dialing PSTN number 5102520001. The call with DID/DNIS
number 5102520001 will be sent through MVP 130 to AltiServ 2’s fax
extension 2221.