AltiGen has
tested and certified Bandwidth.com as a SIP-Trunk service provider for AltiGen
IP PBX systems.
Introduction
From
an administrator’s point of view, a SIP trunk is very similar to a Triton
analog trunk. Once it is up and running, administrators can assign a trunk
access code to it. They also can mix SIP trunks with analog trunks, T1, or PRI
trunks in the Out Call Routing table. Like analog trunks, each SIP trunk has a
PSTN number. They can also receive caller name as well as caller ID.
SIP trunking information provided by Bandwidth.com
- Primary, SIP proxy server IP address 4.79.212.236
or DNS sp-udp01.atl.bandwidth.com
- Secondary, SIP proxy server IP address 216.82.224.202
or DNS sp-udp01.iad.bandwidth.com
- Trunking DID(s):
- The DID(s) are forwarded to the Public
WAN IP address(s), DNS or DNS SRV records of the PBX or InGate SIParator.
InGate SIParator series
The
InGate SIParator is used to provide NAT traversal for SIP messaging. It is
optionally capable of providing a SIP-aware firewall and tagging packets for
SIP QoS.
- Production release 4.5.2 (or better)
- InGate Startup Tool 1.1.7 (or better)
- Public IP address for WAN SIP trunking
- Private LAN IP Address
- Private IP address of the AltiGen IP-PBX
AltiGen MAX1000
- AltiWare 5.1 (ACC or ACM) version 5.1.0.1412 or
above
- Any phones that work with Altigen MAX1000
References
- Ingate SIParator Getting Started Guide
- Bandwidth.com SIP Trunking Service
Description
- AltiGen AltiWare Administrator’s Guide
Use
this form as an aid to setting up your SIP Trunking service.
WAN Side:
|
Internet Access Type and Speed: |
|
|
WAN IP Address: |
|
|
WAN Subnet Mask: |
|
|
WAN Gateway IP Address: |
|
LAN Side:
|
LAN IP of SIParator: |
|
|
LAN Subnet Mask: |
|
|
LAN IP Address of AltiGen IP PBX: |
|
|
VLAN ID: |
|
PBX Info:
|
Model: |
|
|
Firmware Version: |
|
|
Number of SIP Trunk Licenses: |
|
|
Add-on Software Applications: |
|
|
Number of Users: |
|
|
Number of Concurrent Calls: |
|
NAT Traversal:
|
Device: |
|
|
Serial #: |
|
|
MAC: |
|
|
Firmware Version: |
|
Call Quality Management
Internet Access Quality
Voice Optimized Internet Access: Voice Optimized Internet access is a specially
delivered circuit with two separate subnets: one prioritized for voice, and one
for data. The benefit of this method is that it is offered on ADSL, SDSL and
T-1, and the voice quality is excellent. The main issue with this method is
that the voice side of the network only allows voice traffic on specific ports.
This can be problematic for Teleworker, since it is not standard SIP traffic.
At this time, Teleworker must reside on the data side. There is also a
proprietary router provided with this solution. The InGate can still be used behind
the router for NAT traversal.
Packet Prioritization: This method uses priority marked queues or packets to
ensure quality across the carrier Internet backbones. Bamdwidth.com supports
two of these services today.
Qwest Priority T-1 – This
method provided by Qwest allows voice to reside on a priority queue for
outbound traffic. The issues with this method are price and non-prioritization
of inbound traffic. This is also only available on Internet T-1s.
LAN
Quality
SIP Aware Firewall / ALG: Most people think of a firewall as purely a security
device, but most one-way and no-way audio issues can be traced to an improperly
configured or non-SIP ALG firewall devices. Bandwidth.com supports the InGate SIParator,
and has tested and certified it to handle both the security needs of the
customer network and the ALG needs of the SIP trunking service.
VLANs: VLANs
are a standard way to separate virtually the voice and data traffic on the
customer LAN. This allows for easy prioritization and limits the effect of
viruses and other broadcast events on the customer’s network from affecting voice
quality.
PoE: While
PoE provides power to the phones, it also cleans power and can reduce or
eliminate power-related issues, such as hum and static, on IP phones.
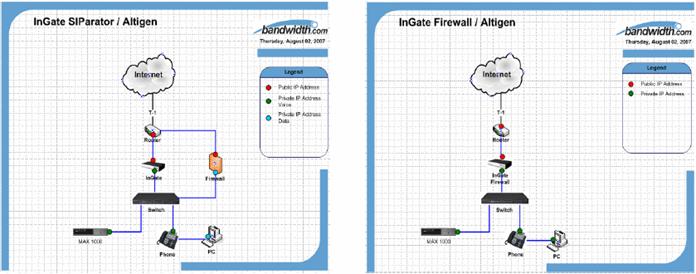
Approved Network Topologies
|
Ingate Sytems – SIParator/Firewall: The Ingate SIParator is an appliance that provides SIP ALG for
NAT traversal. The SIParator is utilized when there is a complex network in
place and the implementation requires a stand-alone VoIP appliance. InGate also has a firewall product with QoS options
for the Packet Prioritization Internet Access options Bandwidth.com supports from Qwest and Sprint. For more information,
visit www.ingate.com . |
|

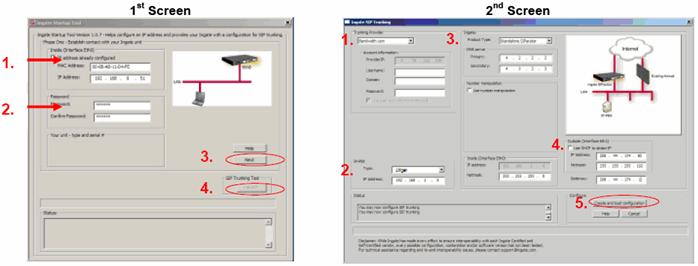
InGate SIParator Configuration
This configuration
assumes that the SIParator is set at the factory default. If the SIParator is coming
from Bandwidth.com, it will most likely be pre-configured for your network.
- If the SIParator
was preconfigured by Bandwidth.com, skip to step 10.
- Go to www.ingate.com > Support > Register Account and register your
company.
- Choose Login to
the site and choose Register a new unit. Make sure you
have your serial number in front of you.
- Activate the
necessary licenses using Activate License link. This will
download a .lic file for each license file required. If you are
downloading more than one license, you will need to rename the files so
that they do not overwrite each other. Typical license examples are: SIP
trunking (typically comes with SIParator when delivered by Bandwidth.com),
additional call traversal licenses, QoS, and SIP-Aware Firewall.
- Next you will
need to download the latest InGate Startup Tool, a link is
provided in the InGate portal.
- Once the InGate
Startup Tool is downloaded, please install it on the computer that will be
configuring the InGate.
- Connect the
laptop or computer with the InGate Startup Tool to the Eth0 port on the
SIParator using a standard CAT5 Ethernet cable.
- After connecting
the SIParator, double-click the
 on your desktop. Insure the laptop or
computer being used is on the same LAN subnet as the SIParator.
on your desktop. Insure the laptop or
computer being used is on the same LAN subnet as the SIParator. - Plug the
SIParator into a power source.

- Once the setup is complete,
connect the WAN network to the Eth1 port and the LAN network (same as PBX)
to the Eth0 port of the SIParator.
AltiGen Setup
Turn on SIP Trunking
1.
Obtain a SIP trunk license
from AltiGen.
2.
Register the license using
AltiGen’s online license registration procedure.
3.
Reboot AltiServ.
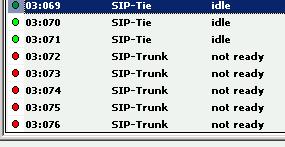
4.
After the system is
rebooted, SIP-Trunk should show as
“not ready” in Trunk View.
5.
Bandwidth.com SIP proxy
uses a private IP address, so don’t configure AltiServ behind NAT, unless you
are using remote IP phones.
If you are using remote IP phones, configure AltiServ behind NAT. Make sure the
Bandwidth.com SIP proxy IP address is configured as a private network under AltiWare Admin > VoIP > Enterprise
Network Management > IP Networks > IP Network. Then, for information
about configuring AltiServ behind a firewall / NAT router, see AltiWare
Administrator’s online Help: Index >
AltiServ behind NAT > configuring.
Configuring in AltiEnterprise Manager
1.
Choose AltiWare Administrator > VoIP > Enterprise Network Management.
This opens AltiEnterprise Manager.
2.
In AltiEnterprise Manager,
click the Codec button.
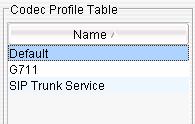
3.
Add a codec profile. In
this example, we name the new profile “SIP Trunk Service”.
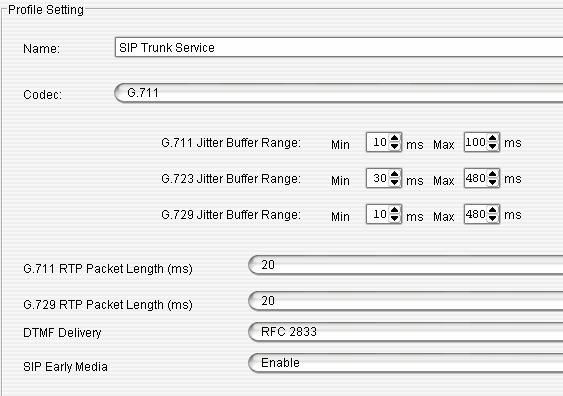
4.
Set the following:
§
Codec = G.711
§
DTMF Delivery = RFC 2833
§
SIP Early Media = Enable
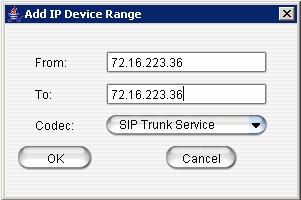
5.
In AltiEnterprise Manager,
go to Servers button > IP Codec tab > IP Device Range panel. Add a range, using the SIP Proxy IP address
that you got from your service provider. In this example, the IP address is 72.16.223.36. The range we
add is:
§
From: 72.16.223.36
§
To: 72.16.223.36
§
Set Codec as “SIP
Trunk Service”.
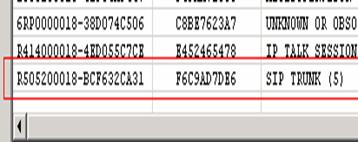
Configuring in AltiWare Administrator
1.
Under “SIPSP” board
configuration, the number of configured channels and licensed channels are
displayed. In this example, there are 5 SIP trunk channels.

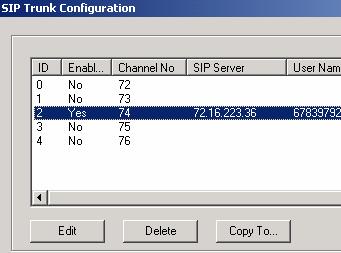
2.
Click the SIP
Trunk Configuration button. The SIP Trunk Configuration dialog box opens.
3.
Highlight an entry in the
dialog box, and then click Edit. The
following dialog box opens:
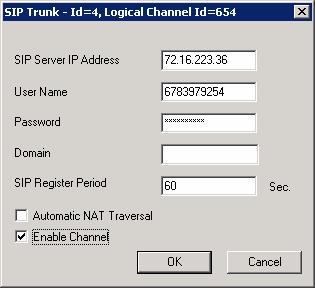
4.
Enter the SIP Server IP
Address, User Name, Password, and SIP Register Period. This account information
is obtained from Bandwidth.com.
5.
Uncheck Automatic NAT Traversal and check Enable Channel.
If
multiple SIP trunks are subscribed, follow the steps below to copy the same
settings to other SIP channels.
1.
Highlight the source entry.
2.
Click the Copy To button.
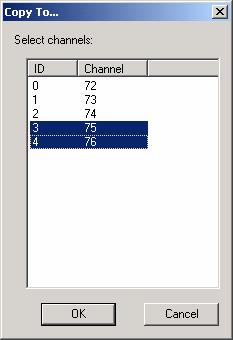
3.
Highlight the destination
channels and click OK.
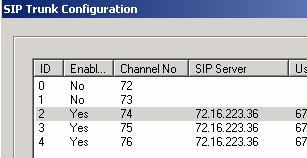
In
Trunk View, the SIP trunks will be displayed as idle. The SIP trunks are ready to use.

Configuring
SIP trunks (trunk access code, in call routing, outcall routing, and so on) is
similar to configuring analog trunks or T1/PRI trunks. See AltiWare
Administrator online Help under “Trunk Configuration,” or see the AltiWare
Administration Manual, “Trunk Configuration” chapter.
Numbering Info
Remember that Bandwidth.com
wants to see a “+” and a “1” on all outgoing calls, so this must be planned
for. Also, Bandwidth.com will be sending you a “+” and a “1” on every call, so
make sure to plan for this when setting up your PBX. The InGate can add the +
for E.164 numbering for you; see this will be done in Number Manipulation in
the Setup Tool.
Operator
must be sent as a plain 0 (no 1)
911
must be sent as +1911
411
must be sent as +1411
International
calls are to be sent without 011. Example: +442151245
Local
and Long Distance Calls; Example: +19192971100
Initial Testing and Troubleshooting
Initial Test Plans
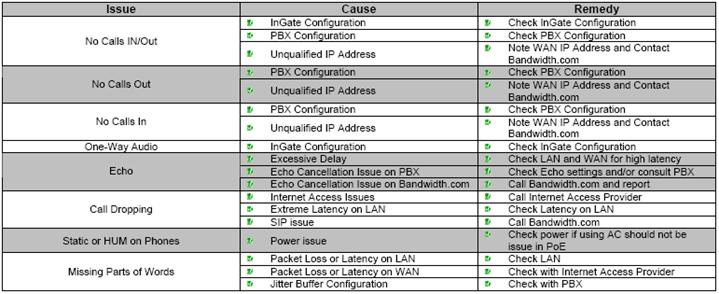
If you run into an issue with any of these tests, consult the
troubleshooting chart below.
- Test an Outbound call
to a Local Number. Check for Ringback, 2-way Audio, and Quality.
- Test an Outbound call
to a Long Distance Number. Check for Ringback, 2-way Audio, and Quality.
- Test an Outbound call
to an International Number. Check for Ringback, 2-way Audio, and Quality.
- Test a Long Outbound
call past 15 minutes.
- Test multiple call
concurrencies on Outbound calls. Setup multiple calls to PSTN
- Test an Outbound Call
to Operator “0”
- Test an Outbound Call
to Directory Assistance “411”
- Test a 911 Call (PLEASE
IDENTIFY TO THE OPERATOR THAT THIS IS A TEST!!!!!)
- Test an Inbound call
to an internal DID. Check for Ringback, 2-way Audio, and Quality.
- Test an Inbound call
to Auto-Attendant. Check DTMF and Audio Quality.
- Test Transferring
calls off-site.
- Test an
Outbound call to an Auto-Attendant and verify DTMF.
Troubleshooting Guide