Softswitch: Call recording using ftp to facilitate file transfer for VRM
If your system has a multi-chassis configuration and the gateway needs to transmit recorded files to a storage server, you need to set up an FTP server to facilitate the file transfer. You do not need to set up an FTP server for a single chassis (all-in-one)
installation.
If your system has a multi-chassis configuration and the gateway needs to transmit recorded files to a storage server, you need to set up an FTP server to facilitate the file transfer.
From the VRM server:
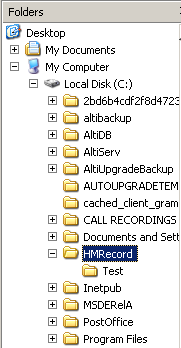
8. Because you may have multiple MAXCS servers, or the ftp is used for other programs, from within the HMRecord folder, create a new folder, in this example we will call it "Test"
Back at the Softswitch Recordings configuration window:
9. Check Gateways Use FTP Protocol to Transmit Recorded Files to Central Location.
11. When you are finished configuring, click OK.
Now log into VRM Admin.
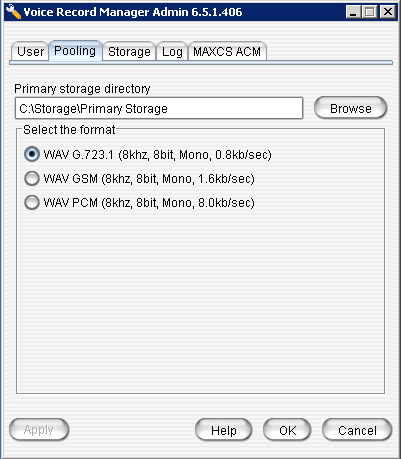
Click on the Pooling tab. Take note of the Primary Storage directory.
VRM Admin pools the newly recorded files from the MAXCS softswitch, and saves them into the primary storage directory in the .wav format you select here (G.723.1, GSM, PCM).
Click on the MAXCS ACM tab:
Now we must tell VRM which server and centralized recording directory that the VRManger will access.
12. In the AltiWare ACC or ACM page of VRM Admin, click the New button.
13. Enter the MAXCS ACC or ACM Server IP Address, Centralized Recording Directory, User Name and Password. Then click OK.
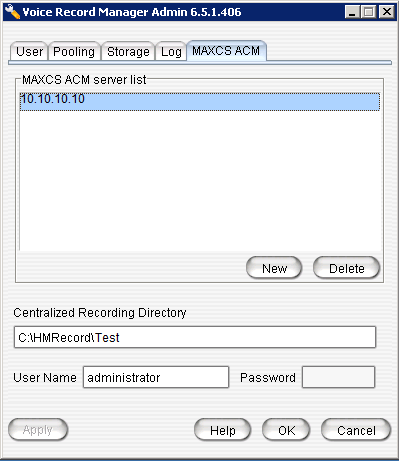
VRManager starts converting all voice recording data as soon as the MAXCS ACC/ACM Server information is added to the MAXCS ACC or ACM Server List.
To Enable and Configure Centralized Recording
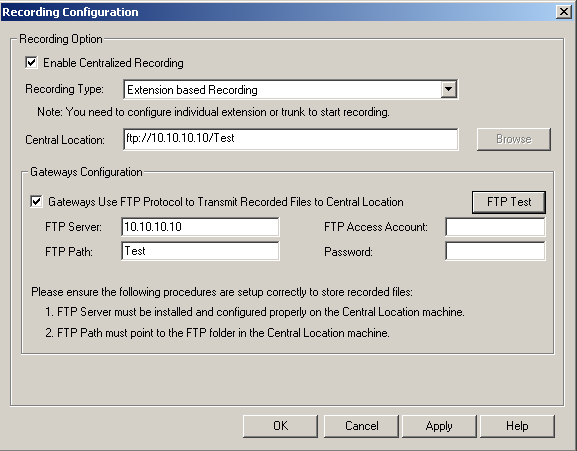
1. Check the Enable Centralized Recording check box.
2. Select a Recording Type from the drop-down list.
Important: When using FTP protocol, the FTP server must be installed and configured properly on the same machine as the Central Location
directory. (setting up a FTP server detailed below) 2. Select a Recording Type from the drop-down list.

Important: When using FTP protocol, the FTP server must be installed and configured properly on the same machine as the Central Location
From the VRM server:
3. An FTP folder must be created for the Central Location, so that it can be fully accessible through FTP. (IIS must be installed on the server)
4. Create the ftp directory folder on the local drive of the VRM server. In this example we will call it HMRecord
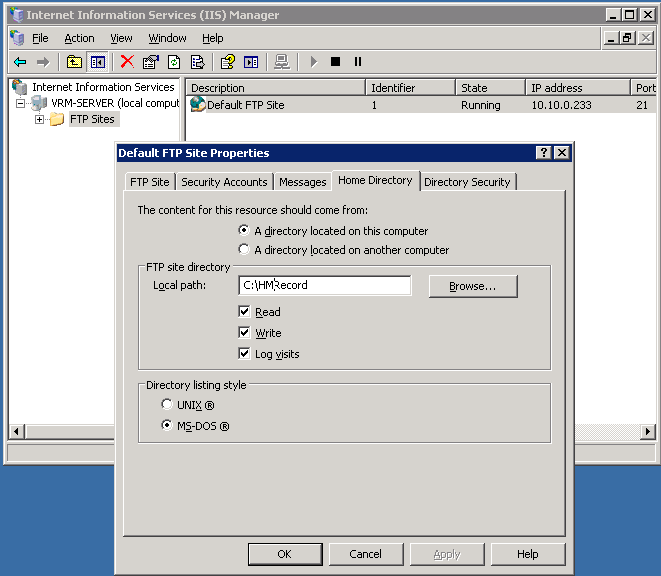
5. Then configure IIS. You will need to go to Control Panel->Administrative Tools->Internet Information Service (IIS) Manager.
6. Expand the folders until you see "Default FTP Site" then right click on it and choose properties. Click on the Home Directory tab.
7. In the local path field, enter the full UNC path for the folder (central location) that was just created and hit "Ok" when done.
In this example the path is: C:\HMRecord. This folder should have read and write access.

8. Because you may have multiple MAXCS servers, or the ftp is used for other programs, from within the HMRecord folder, create a new folder, in this example we will call it "Test"

Back at the Softswitch Recordings configuration window:
9. Check Gateways Use FTP Protocol to Transmit Recorded Files to Central Location.
a. FTP Server—Enter the IP address of the FTP server. (10.10.10.10)
b. FTP Access Account—An FTP server account name that gateways can log in to. (if specified)
c. FTP Path—Enter the directory that the files will be transmitted to on the FTP server. (Test)
b. FTP Access Account—An FTP server account name that gateways can log in to. (if specified)
c. FTP Path—Enter the directory that the files will be transmitted to on the FTP server. (Test)
d. Password—FTP account password. (if specified)
10. Click the FTP Test button to verify that login to the FTP server is successful. 11. When you are finished configuring, click OK.
Now log into VRM Admin.
Click on the Pooling tab. Take note of the Primary Storage directory.
VRM Admin pools the newly recorded files from the MAXCS softswitch, and saves them into the primary storage directory in the .wav format you select here (G.723.1, GSM, PCM).

Click on the MAXCS ACM tab:
Now we must tell VRM which server and centralized recording directory that the VRManger will access.
12. In the AltiWare ACC or ACM page of VRM Admin, click the New button.
13. Enter the MAXCS ACC or ACM Server IP Address, Centralized Recording Directory, User Name and Password. Then click OK.

VRManager starts converting all voice recording data as soon as the MAXCS ACC/ACM Server information is added to the MAXCS ACC or ACM Server List.
Attachments
No attachments were found.Related Articles
- License bundles in MaxCS Cloud
- MaxCS Softswitch SaaS Datasheet
- MaxCS 7.5 All-software Solution Deployment Guide
- MaxACD 7.0 Voice Recording FTPS Support
- MaxACD 7.0 Voice Recording FTPS Support


 Your changes will require approval by an administrator before they are published.
 The article has been updated successfully but requires approval before it is published.
